With step-by-step instructions and a handy video, we show you how to turn your bath into a multi-purpose shower bath by fitting a bath screen. Just one of our Easy Switches…
Whilst we would highly recommend hiring a professional tradesperson to fit and plumb your bathroom, there are a few things you can attempt yourself. A bath screen isn't too difficult to install if you are confident in your DIY skills. And, as part of our series of Switches and Fixes, in this expert guide, we’ll show you how.
Bath screens or bath shower screens as they are sometimes known, come in a whole array of sizes, shapes and designs, including:
- Static (doesn’t move)
- Hinged (moves outwards or inwards)
- Foldable (concertinas and folds away)
You can find fitting instructions for other bathroom products by clicking the links below:
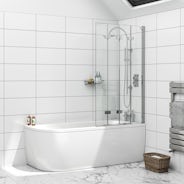
A bath screen is most commonly used with straight baths so that a shower can be used whilst standing up in the bath. The bath screen keeps water from splashing into the bathroom when using the shower. Shower curtains are sometimes used for the same purpose.

The Orchard straight shower bath screen contains 6mm British Standard safety glass for added peace of mind
Before you do anything
Always unpack your bath screen immediately after delivery. Check for any damage or faults as it’s better to find them now, rather than during installation.
Always turn off your water at the mains before attempting any DIY in the bathroom.
Tools you’ll need:
- Electric drill
- Hammer
- Masking tape
- Pencil
- Sealant gun
- Spirit level
- Standard screwdrivers
- Tape measure
Check you have the following:
Usually supplied with the panel:
- Glass screen and frame
- Screws
- Screw caps
- Seal
- Wall channels
- Wall plugs
Will need to buy separately:
- Silicone sealant
Time to complete:
- 30 mins
Step-by-step video
At Victoria Plum, you’ll find our bath screens are manufactured with high quality safety glass. If the glass were ever to be struck with considerable force, it has been designed to shatter, so as not to leave any shards which could cause major injury.
In this video, we show you how to fit a hinged bath screen.
Here is how to fit a bath screen
-
Once you’ve removed all of the packaging, check that you have all of the required parts using the instructions provided.
-
Your wall channel should have pre-drilled screw holes. If not, you may need to add these yourself.
-
Offer the channel up to the wall and mark the screw holes using a spirit level, to ensure everything is straight. Before drilling, make sure you check for wires and pipes.
-
Drill the holes into the wall and add wall plugs, tapping in with a hammer if necessary.
-
Screw the wall channel to the wall and insert the bath screen into the wall channel.
-
Drill 3 evenly spaced holes through both the wall channel and bath screen using the recommended drill bit size.
-
Screw the bath screen into the wall channel, capping the screws when done.
-
Fit the seal to the bottom of the bath screen.
-
If your screen comes with a handle or towel rail, fit this now.
-
Finish with a bead of silicone sealant down the outside edge of the wall channel. Don’t seal the inside part of the bath screen.
Handy hint: Treat your screen with Showerguard easy clean bathroom coating kit, making it easier to clean and maintain.
Congratulations, you’ve now fitted your bath screen.
These instructions are for a simple, hinged bath screen. If you have a different type of bath screen, please see the instructions that came with it.
Step by step images
To help you visualise fitting your bath screen, we’ve also included these step by step images.
Removing the packaging and checking you have all required parts.

Adding screw holes.

Marking screw holes using a spirit level.

Drilling holes into the wall.

Screwing the channel to the wall and inserting bath screen.

Drilling 3 holes through wall channel and bath screen.

Screwing bath screen into wall channel.

Fitting the seal.

Fitting the towel rail.

Adding silicone sealant to outside edge.

A final note…
Whilst DIY can be a good way to save time and money, you should always hire a qualified professional to plumb and install your products. The instructions above are simply a guide to fitting your new bath screen and shouldn't be used to attempt full plumbing and installation.
Shop bath shower screens
At Victoria Plum, you’ll find a comprehensive range of bath screens with designs to suit all tastes and all budgets. Shop bath shower screens today by clicking below.

More bathroom DIY advice
To save money on bathroom DIY, why not check out more of our expert “how to” guides? Simply click on any of the links below to see a new article.
More Easy Switches
To transform your bathroom quickly and easily, check out just some of our other Easy Switches: