In this expert guide, complete with handy video and step-by-step instructions, we show you how to install a pedestal basin in your bathroom.
First off, it’s important to say that we would ALWAYS recommend hiring an experienced plumber to fit your new bathroom. This article is intended to merely demonstrate the process of fitting a new sink or basin, so you can understand exactly how it is done.
Bathroom basins or bathroom sinks, depending on how you refer to them, come in a wide variety of shapes, sizes and designs. At Victoria Plum, we categorise them into 5 main types:
If you're unsure which basin type you wish to install, take a look at our basin buying guide for further information.
What is a full pedestal basin?
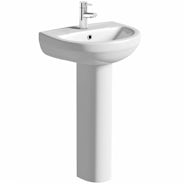
A full pedestal basin is the most common type of basin found in homes throughout the UK. The basin is attached to the wall and sat on top of a pedestal, which is where it gets its name. The pedestal offers support and helps to hide unsightly plumbing. The best bathrooms tend to have a basin that matches the rest of the suite.

The Eden from Orchard Bathrooms is a great example of a pedestal basin
Before you do anything
Always unpack your pedestal basin immediately after delivery. Check for any damage or faults as it’s better to find them now, rather than during installation.
Always turn off your water at the mains before attempting any DIY in the bathroom.
Tools you’ll need:
- Adjustable wrench
- Adjustable pipe wrench
- Pencil
- Sealant gun
- Spirit level
- Standard screwdrivers
- Tape measure
Check you have the following:
Usually supplied with pedestal basin:
- Basin
- Pedestal
May need to buy separately:
- Basin waste
- Fixings (We sell a wall hung basin fixing kit, but this is only appropriate for use when mounting to a solid masonry wall or a partition wall with a timber frame built into the cavity for the basin to hang from. If mounting to a partition wall (without timber frame) or plasterboard wall, please seek professional help to identify the appropriate fixings)
- Silicone sealant
- Tap(s)
Typical time to complete:
- 1–2 hours
Typical cost to fit (with taps and waste):
- £330—£360 (price may vary—find out more about bathroom fitting costs)
How to fit a pedestal basin video
In this video, for demonstration purposes, we show you how to fit the Orchard Eden 1 tap hole full pedestal basin.
Here's how to fit a pedestal basin
Step 1
Find your centre position using a spirit level. Mark this on both the wall and the floor.
Step 2
Place the pedestal and basin in position and check that it is level.
Step 3
Now, mark the outline of the basin on to the wall.
Step 4
You can now fit the waste.
Find out how to fit a basin waste with our expert guide.
Step 5
Next, fit the tap(s). Make sure the tap(s) is/are at 90 degrees to the inner rim.
Read our handy guide on how to fit a basin mixer tap or, if you have separate pillar taps, see our guide on fitting basin taps.
Step 6
Place the basin back on to the pedestal and mark the position of the bolt holes. Some pedestals come with the option of fixing to the floor. If so, mark these as well.
Step 7
Before drilling, check for wires and pipes, then use masking tape to prevent the drill bit from slipping while drilling. See our guide on drilling through tiles. And remember to use the correct safety equipment when using tools.
Step 8
Insert the wall plugs and fixing bolts provided with your basin.
Step 9
With your basin secure, measure and cut the waste pipe to size.
Step 10
Fit your trap. To see how, check out our handy guide on fitting a basin waste trap.
For wall mounted waste pipes, a P trap is required but for floor waste pipes, you will need a straight trap.
Step 11
With the trap in place, connect the hot and cold water inlets.
Step 12
Turn on the water supply.
Step 13
Place the pedestal in position.
Step 14
Finish the installation by sealing all joins with silicone sealant. You can use tape to ensure a neat finish when sealing.
Congratulations, you’ve now fitted your pedestal basin.
Step-by-step images
To help you through the sink fitting process, follow these step-by-step images.
Marking the centre position.

Checking basin and pedestal are level.

Marking the outline of the basin on the wall.

Fitting the waste.

Fitting the tap(s).
")
Marking the position of the bolt holes.

Drilling the bolt holes.

Inserting wall plugs and fixing bolts.

Cutting the waste pipe to size.

Fitting the trap.

Turning on the water supply.

Placing the pedestal in position.

Sealing all joins with silicone sealant.

And finally...
Whilst DIY can be a good way to save time and money, you should always hire a qualified professional to plumb and install your products. The instructions above are simply a guide to fitting your new pedestal basin and shouldn’t be used to attempt full plumbing and installation.
If you are considering fitting products yourself, you may want to read our article on how easy it is to install a bathroom suite first.
Shop basins
At Victoria Plum, you’ll find a huge selection of basins, including pedestal, semi pedestal, wall hung and countertop designs, not to mention space-saving vanity units and beautiful washstands.
All our basins are made from the highest quality glazed ceramic making them tough. Find out more about how our basins are made or browse our full range by clicking on the image below.

More bathroom fitting advice
Looking for more DIY advice for your bathroom? Head to our bathroom advice section or click on any of the links below to read an article.