If you’re fitting your own tiles, we’ll show you how to mix and apply tile adhesive correctly for a clean and professional finish, as well as demonstrating how to work out how much adhesive you’ll need.
If you’re comfortable with intermediate DIY tasks, tiling your bathroom or kitchen walls is something you can do yourself. Once you have prepared your wall for tiling, you’ll need to work out how much tile adhesive you’ll need, before mixing and applying it correctly. This will ensure your tiles are applied safely and securely to your wall.
Watch our video below and follow our step-by-step guide to apply the perfect professional finish to your interiors.
What you’ll need
- Bucket
- Adhesive
- Mixing paddle (can be bought from most hardware stores)
- Notched trowel
- Protective equipment (eyewear, facemask, gloves)
- Spacers
- Water
If you’ve chosen ready-mixed adhesive, you won’t need a bucket, mixing paddle or water.
Browse our quality range of tile tools and accessories for many of the items listed above.
Time to complete
- Allow around 15–30 minutes for each square metre.
How to mix and apply tile adhesive
Watch this short video on how to mix and apply tile adhesive.
Here’s how to mix and apply tile adhesive
Before you start mixing, ensure your surfaces are ready for tiling. You can find out how to do this in our expert video wall priming guide.
The manufacturer’s instructions on the tile adhesive packaging will detail which types of tile it can be used with, as well as how much water you need to use when mixing.
If you’ve chosen to use ready-mixed adhesive, please ignore steps 1 to 4.
-
Pour the required amount of water into your bucket first to avoid unmixed powder.
-
Make sure you are wearing appropriate protective clothing, including gloves, eyewear and a face mask. The cement-based powder can cause irritation.
-
Stir the adhesive, making sure you reach into the sides and base of the bucket. A mixing paddle (which can be found in most hardware stores) is essential for this step.
-
Keep mixing until you have a smooth consistency with no more powder or lumps. You are now read to apply the adhesive to your walls.
-
Adhesive can set quickly when spreading onto the wall, so stick with a small area to begin with. This way you won’t waste too much of your mixture.
-
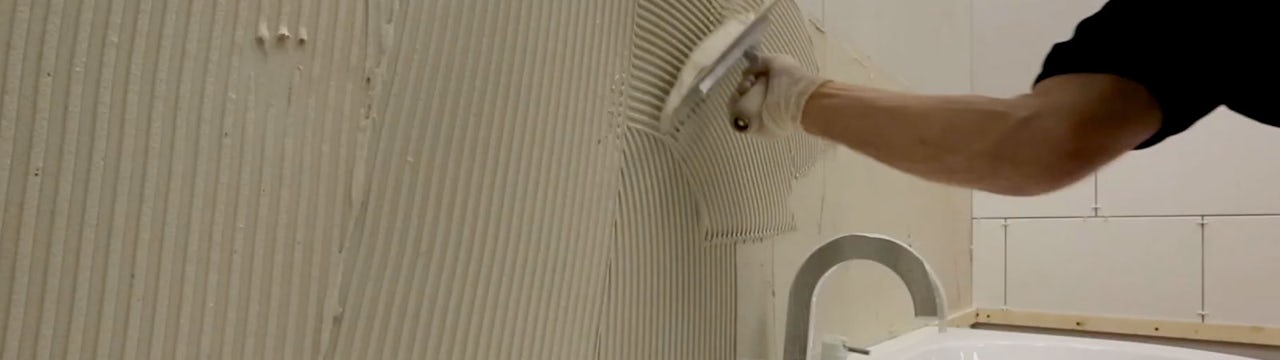
Use a notched trowel to create channels as these create a texture with more grip.
-
Push your tile into the adhesive and give it a slight twist. This will bed it securely onto the wall and reduce the air that can sit between the tile and wall surface.
-
Repeat this with the next tile, using spacers to separate the tiles as you go.
-
Once you’ve tiled your wall and allowed the adhesive to set (check the manufacturer’s instructions for drying times), it’s time for grouting. You can find out how to grout and work out how much grout you’ll need in our handy guide.
Congratulations, you have now mixed and applied your tile adhesive.
Step-by-step images
Pour water into your bucket.

Wear appropriate safety equipment.

Add the adhesive powder.

Mix the adhesive until smooth.

Apply adhesive using a notched trowel.

Fit your tiles.

Repeat separating tiles using a spacer.

How much tile adhesive do I need?
At this stage, you should already know the total area being tiled (in metres squared), which will help you calculate how much tile adhesive you need.
You’ll find the approximate coverage of your adhesive on the product page.
For example, a 20kg bag of UltraTile Pro Set wall and floor tile adhesive (powder) will cover approximately 4 to 5 square metres of tiles, at a bed thickness of 3mm (this is how thick the layer of adhesive is). The bed layer can be up to 12mm if needed.
A 10 litre bucket of UltraTile Pro Grip ready mixed wall tile adhesive will cover approximately 6 square metres of wall tiles.
You should always add around 10% to the total adhesive figure for any spillages or mishaps.
Shop grouts and adhesives
We stock a range of high quality adhesives and grouts from some of the leading names in tiling. With both ready-mixed and cementitious powder adhesives, you can easily find the right product for your tiling project.

Expert help and advice on tiling
If you’re giving tiling a go yourself and need further help and advice, you’ll find plenty of expert guides, complete with videos and step-by-step instructions, here at Victoria Plum.
Head to our bathroom advice section or simply click on any of the links below.
- How to tile
- How to grout tiles & work out how much grout you need
- Tiles buying guide
- How to replace a damaged tile
- How to remove old grout from tiles
- How to regrout tiles
- How to drill through a tile
- How to clean tiles
- Ask the experts: Should I fit the toilet before or after tiling the floor?
- Ask the experts: Can I tile over old tiles?
Searching for tile inspiration? Why not check out these fabulous blog posts…
- Stylist’s Selection: 9 stylish wall and floor ideas for bathrooms
- 5 exciting and unusual ways to use tiles in your bathroom
- 6 more bathroom tile ideas that'll capture your imagination
- 5 things to consider when choosing your bathroom tiles
- Small Spaces: Small bathroom tile ideas
- Tiles inspiration gallery


